
The RT3000 v3, RT500 and Survey+ v3 include a WiFi transmitter that allows you to wirelessly connect your PC to the unit and monitor the output on NAVdisplay. This is easy to setup. However, if there are multiple units on the network and you would like to monitor the output of all of them via WiFi, there are extra configuration steps.
Note: the recommended method to monitor multiple units is to connect via Ethernet as these extra steps are not needed. This is the simplest method.
Background information
The reason this functionality is difficult to setup is: routers do not forward broadcast packets by default.
Forwarding broadcast packets involves the router redirecting the packet to every IP-enabled interface. This creates traffic that could overload the network. OxTS units broadcast their NCOM packets by default to allow any device (with an IP address in the correct range) to receive them. The problem arises in the following scenario:
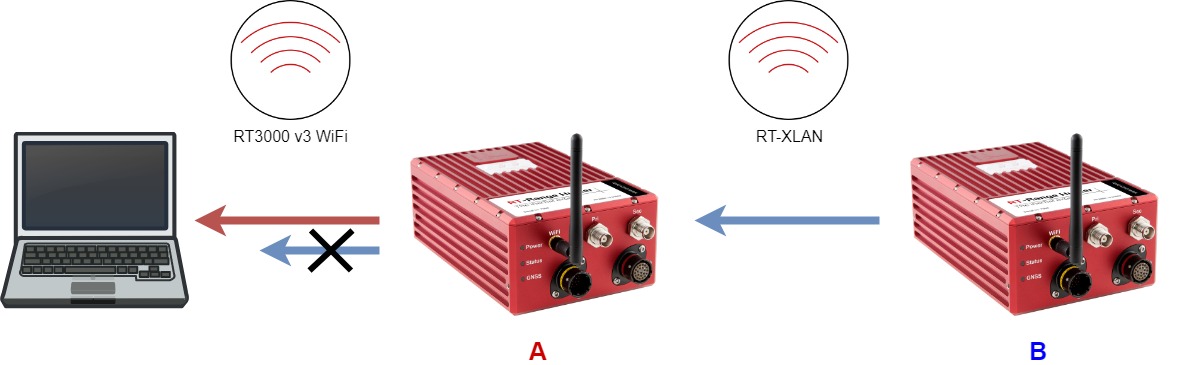
Unit A is setup as a Hunter and is using unit B as a target. They are on the same network connected via RT-XLAN antennas (or equivalent WLAN connection/Ethernet) and your PC is connected to unit A's WiFi.
The PC is receiving navigation data (NCOM packets) from unit A. The PC is also receiving range data (RCOM) packets from unit A. This means that unit A is receiving NCOM packets from unit B. However, the PC is not receiving NCOM packets from unit B. To receive the NCOM packets from unit B they must be forwarded from the router of unit A, but routers do not forward broadcast packets.
Solution: configure unit B to direct NCOM packets to the PC as well as broadcasting them.
Configuration of Unit A
Connect to unit A via Ethernet.
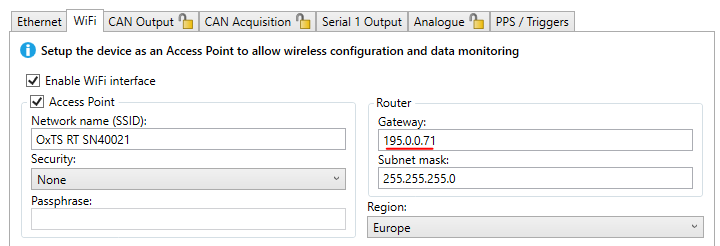
Configure the unit in NAVconfig. In the Interfaces section, setup the device as an Access point and make a note of the router gateway address:
Finish the configuration and commit it to the device.
Find the IP address of your PC
Connect to the WiFi of unit A (allow 5 minutes for the WiFi router to boot up).
Open a Command Prompt window and use the 'ipconfig' command. Note down the IPv4 Address of the Wireless LAN adapter WiFi.
Configuration of Unit B
Connect to unit B via Ethernet.
Configure the unit in NAVconfig. Add the following lines in the Advanced section of NAVconfig:
-udp2_ncom_100.00
-udp2_ncomx_1.00
-udp2_address[addr1]:3000
-gateway_address[addr2]
where:
[addr1] = IPv4 address of the PC WiFi adapter
[addr2] = router gateway address of unit A.
Example:
-udp2_ncom_100.00
-udp2_ncomx_1.00
-udp2_address192.168.0.4:3000
-gateway_address195.0.0.71
Finish the configuration and commit it to the device.
Add these commands to any additional units that you wish to monitor via WiFi.
Monitor via WiFi
Connect to the WiFi of unit A.
Open NAVdisplay. You should now be able to select the NCOM stream of unit A and unit B.
Note: with this setup, you will be able to monitor units A & B from the WiFi of unit A but not from the WiFi of unit B. Also, only the PC with IP address [addr1] will see the NCOM stream of unit B.
Comments
0 comments
Please sign in to leave a comment.